In this part of my 2 part guide I'll be addressing the troubling topic of virus's providing you with some tips and techniques on how to manage the issues associated with them.
A great anti-virus program I've been using lately is Avast Antivirus. This is a great free antivirus program that utilizes minimal system resources and is very easy to setup. If your a technical person you may like these features:
*Definable heruistic levels for various scanning types.
*Rootkit scan upon startup.
*Custom scan profiles w/dozens of parameters
*Real-time scanning of web access, email, IM, P2P with independently definable scanning parameters.
So why not use a popular program like Norton and McAfee?
Ever notice that as soon as you install one of these products on your computer your PC begins to slow to a creeping crawl? Ever get locked out of your internet because of your firewall? Or how about when Norton just plain breaks preventing web browsing, access to your files, and use of your wireless. If these have never happened to you wonderful. If they have I'm not surprised. These are common problems with McAfee and Norton products as they often interact with areas of your Windows they simply should not.
Besides why pay for protection when you can get it for free!
Avast! isn't the only free anti-virus out there Ryan!
Your absolutely right. Don't just take my word for it find out for yourself. There are some great products out there. Antivir, AVG Free, just to name a couple. Avast is a great start for people looking to install protection that is very effective right out of the box so to speak.
You can find Avast! Anti-Virus Here: http://www.avast.com/free-antivirus-download
Monday, February 22, 2010
Monday, February 15, 2010
A quick and easy way to manage your IP addresses
If you find yourself constantly managing your IP addresses, Proxy addresses, and windows workgroup information, I have a great free tool for you. Free IP Switcher provides a nice set of features that come standard with most IP changers but takes it a step further and places it all in a clean interface. You can create IP profiles for multiple hardware interfaces, set machine name and workgroup profiles, and set Proxy Server Settings for secure browsing:

If you use your laptop at home and at the office, this will save you the trouble of having to switch back and forth between IP addresses and Filesharing workgroup names.
The interface is very clean and so far I found it to be bug free. Free IP Switcher can also be configured to start up automatically as windows boots.
You can find Free IP Switcher here:
http://www.eusing.com/ipswitch/free_ip_switcher.htm
Monday, February 1, 2010
Virus's and Spyware: A Guide to performing your own Maintenance Part 1 of 2
In this 2-part series I'll introduce some easy ways to keep your PC clean, and protect against viral and malware infection. I'm going to outline free software to help you accomplish this. Where to get it and how to set it up.
If you'd like more information on virus' and how they work, click on one of the links below:
What is Malware?
What is a virus?
What is spyware?
Before we begin I'd like to clarify that there is no substitute for a trained technician. If you are in danger of losing your data, I recommend you seek professional assistance.
If you own a PC you've probably encountered a virus. At this very moment there is undoubtedly spyware sitting somewhere in your computer. While you struggle protecting yourself from unwanted programs, Mac users will boast how proud they are that Mac's never get infected. All the while, you shell out hundreds of dollars a year taking your computer into a shop to clean out all the junk you've piled on to your system. Frustrating to say the least.
At the end of my 2 part guide you will be able to perform your own system maintenance and dramatically increase the health of your computer. I'll cover methods of freeing up your hard drive space, protecting your browser from spyware, and keeping your computer safe from infection.
I would estimate you can eliminate 60% of unwanted software by following these guidelines:
Curiosity kills both cats and your computer!
Now that we've covered some basic habits to prevent infection, lets take a look at building up a good set of tools to perform some regular maintenance. A weekly clean for you will consist of the following:
Doing a weekly scan with these programs will save you a heap of headache and money. Spybot and MalwareBytes will provide you a solid set of Malware and Spyware detection services. Cleanup! performs extensive system cleaning of your temporary file directories that eat up drive space over time. Avast anti-virus is an excellent, completely free, anti-virus program. Avast has added a few really nice features recently that sold me on their freeware version.
MalwareBytes Anti-Malware
Open your web-browser and go to www.malwarebytes.org and click the "download free version" link then install MalwareBytes on your system. Perform an update of MalwareBytes before scanning your system. Doing this will ensure Malwarebytes is scanning with the latest malware database :

To perform a full system scan:
-From the Scanner section, click on the "Perform full scan" toggle
-Click the scan button below:

If MalwareBytes finds any infected objects:
-Click the "Show Results" button in the bottom right of the window.
-From the results window, click "Delete All".
Some items aren't always deleted right away so you may be asked to restart your computer to complete the cleaning.
Spybot S&D
Go to www.safer-networking.org and download Spybot S&D. During the installation process you will be asked if you would like to perform a software update of spybot. Clicking "yes" will bring up the window shown below:

The list shown above is a list of updates. Be sure to update all the items titled "detection rules" and click "Download". After the download completes, Spybot should start normally.
Next, were going to enable a very important area of spybot called "Immunize". This will protect your browser from nearly 200,000 types of unwanted programs. To access this feature, click the "immunize" button in the left section of Spybot's main menu:

In the immunize page, take notice of the top right of the page:

The top right of this window will show you the anti-spyware it is aware of and actively protecting against (Protected), the files yet to be loaded (unprotected), and the Total files spybot has at its disposal:

To load all entries, click Immunize:

Once completed, your browser will be loaded will Spybot's immunization database.
Now your ready to perform your first scan. Spybot's web site has some very well written resources if you'd like a guided walkthrough of performing your first scan, visit Safer Networking for additional info on scans and how to interpret scan results with Spybot.
CleanUp!
CleanUp! is a great free program that will clean windows of temporary files. Temporary files are created in many different ways as you make changes to your computer and run software. Over a period of 1 month an average computer can accumulate roughly 500mb of temporary files or "Junk" files. After 6 months you could easily find yourself with a large portion of disk space vanishing into thin air. You can avoid losing out on precious hard drive space with this free program.
The interface may not look like much but it is very effective at cleaning your hard drive:

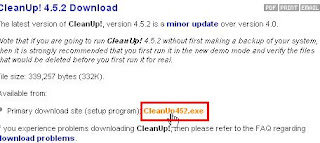
Click this link to Stevegould.org to download CleanUp!. Before downloading this program take a second to read this introduction then scroll to the bottom of the page and click "next". Next, click the link shown here:
After you download and install CleanUp!, your first run of CleanUp! will throw up this message:

If you click yes, CleanUp! will scan, show you results, and won't delete anything. If you click no, a normal scan will be conducted and will delete all junk files it finds. Be sure to close all your browser windows before you start your scan otherwise you'll see this window:

love the flush! if you'd like to turn that off scroll to the bottom of this section. At the end of the scan your results will be shown in the main CleanUp! Window:

I recommend a quick scroll through the list of deleted items to see what CleanUp! deleted from your system. Its good to have a rough idea where these files may be nestled in the event you'd like to perform a manual removal of these junk files. If you ran CleanUp! in Demonstration Mode, close cleanup and open it back up again to run it in normal mode.
Disable the loud Flush. In the Cleanup main window click the options button. Then uncheck the check box shown here:

Avast Antivirus
Avast Antivirus will be covered in part 2 of this entry. Virus detection and removal offers a few extra challenges and I think I've addressed a nice chunk of info already. In my next post I'll explain some of the key features you'll want to look for in anti-virus software and how to use those features to your advantage.
Hope this helps! Happy cleaning!
A big thanks to uncle Rob for his years of guidance!
If you'd like more information on virus' and how they work, click on one of the links below:
What is Malware?
What is a virus?
What is spyware?
Before we begin I'd like to clarify that there is no substitute for a trained technician. If you are in danger of losing your data, I recommend you seek professional assistance.
If you own a PC you've probably encountered a virus. At this very moment there is undoubtedly spyware sitting somewhere in your computer. While you struggle protecting yourself from unwanted programs, Mac users will boast how proud they are that Mac's never get infected. All the while, you shell out hundreds of dollars a year taking your computer into a shop to clean out all the junk you've piled on to your system. Frustrating to say the least.
At the end of my 2 part guide you will be able to perform your own system maintenance and dramatically increase the health of your computer. I'll cover methods of freeing up your hard drive space, protecting your browser from spyware, and keeping your computer safe from infection.
I would estimate you can eliminate 60% of unwanted software by following these guidelines:
- Avoid being "click-happy" while web browsing. Closely examine what you are clicking and decide if it is explicitly where you want to go. Practice a healthy sense of caution.
- Use an ad-blocker. A number 1 source of Malware and Spyware are ads that claim they are legitimate products or services. If you receive a pop-up, study it carefully. It will usually contain a "close" or "cancel" button. If it is a window, DO NOT click anywhere in the ad simply close the window by clicking the "X" in the top right of the window.
- Don't respond to fake messages on Porn sites. Embarrassing but true. Majority of computers I've worked on have gotten infected because of reckless porn browsing. If you've taken your computer in because of reckless browsing, a trained technician can spot your browsing habits a mile away.
Curiosity kills both cats and your computer!
Now that we've covered some basic habits to prevent infection, lets take a look at building up a good set of tools to perform some regular maintenance. A weekly clean for you will consist of the following:
Doing a weekly scan with these programs will save you a heap of headache and money. Spybot and MalwareBytes will provide you a solid set of Malware and Spyware detection services. Cleanup! performs extensive system cleaning of your temporary file directories that eat up drive space over time. Avast anti-virus is an excellent, completely free, anti-virus program. Avast has added a few really nice features recently that sold me on their freeware version.
MalwareBytes Anti-Malware
Open your web-browser and go to www.malwarebytes.org and click the "download free version" link then install MalwareBytes on your system. Perform an update of MalwareBytes before scanning your system. Doing this will ensure Malwarebytes is scanning with the latest malware database :

To perform a full system scan:
-From the Scanner section, click on the "Perform full scan" toggle
-Click the scan button below:

If MalwareBytes finds any infected objects:
-Click the "Show Results" button in the bottom right of the window.
-From the results window, click "Delete All".
Some items aren't always deleted right away so you may be asked to restart your computer to complete the cleaning.
Spybot S&D
Go to www.safer-networking.org and download Spybot S&D. During the installation process you will be asked if you would like to perform a software update of spybot. Clicking "yes" will bring up the window shown below:

The list shown above is a list of updates. Be sure to update all the items titled "detection rules" and click "Download". After the download completes, Spybot should start normally.
Next, were going to enable a very important area of spybot called "Immunize". This will protect your browser from nearly 200,000 types of unwanted programs. To access this feature, click the "immunize" button in the left section of Spybot's main menu:

In the immunize page, take notice of the top right of the page:

The top right of this window will show you the anti-spyware it is aware of and actively protecting against (Protected), the files yet to be loaded (unprotected), and the Total files spybot has at its disposal:

To load all entries, click Immunize:

Once completed, your browser will be loaded will Spybot's immunization database.
Now your ready to perform your first scan. Spybot's web site has some very well written resources if you'd like a guided walkthrough of performing your first scan, visit Safer Networking for additional info on scans and how to interpret scan results with Spybot.
CleanUp!
CleanUp! is a great free program that will clean windows of temporary files. Temporary files are created in many different ways as you make changes to your computer and run software. Over a period of 1 month an average computer can accumulate roughly 500mb of temporary files or "Junk" files. After 6 months you could easily find yourself with a large portion of disk space vanishing into thin air. You can avoid losing out on precious hard drive space with this free program.
The interface may not look like much but it is very effective at cleaning your hard drive:

Click this link to Stevegould.org to download CleanUp!. Before downloading this program take a second to read this introduction then scroll to the bottom of the page and click "next". Next, click the link shown here:

After you download and install CleanUp!, your first run of CleanUp! will throw up this message:

If you click yes, CleanUp! will scan, show you results, and won't delete anything. If you click no, a normal scan will be conducted and will delete all junk files it finds. Be sure to close all your browser windows before you start your scan otherwise you'll see this window:

love the flush! if you'd like to turn that off scroll to the bottom of this section. At the end of the scan your results will be shown in the main CleanUp! Window:

I recommend a quick scroll through the list of deleted items to see what CleanUp! deleted from your system. Its good to have a rough idea where these files may be nestled in the event you'd like to perform a manual removal of these junk files. If you ran CleanUp! in Demonstration Mode, close cleanup and open it back up again to run it in normal mode.
Disable the loud Flush. In the Cleanup main window click the options button. Then uncheck the check box shown here:

Avast Antivirus
Avast Antivirus will be covered in part 2 of this entry. Virus detection and removal offers a few extra challenges and I think I've addressed a nice chunk of info already. In my next post I'll explain some of the key features you'll want to look for in anti-virus software and how to use those features to your advantage.
Hope this helps! Happy cleaning!
A big thanks to uncle Rob for his years of guidance!
Subscribe to:
Comments (Atom)